
|
Electronic Documentation for NeonJax3D Path Crawler Version 1.0 July 9th, 2002 Copyright (c) 2002 by Richard Goedeken A product of Fascination Software Co. |
|
Legal Stuff:
This software (NeonJax3D SDK Version 1.0) is copyrighted software. I give you (the LICENSEE) permission to freely copy and distribute this software in any manner to anyone (the RECIPIENTS) as long as the following two conditions are met:
Fascination Software, and Richard Goedeken, are not in any way liable for any damages incurred by the use of this software. The user assumes full responsibility for the use of this software. |
| PathFind.txt |
|
This document was written with the assumption that the reader understands the basic operating principles of the NeonJax3D screen saver, the 1000 Points of Light object and the Marquee effect. If the reader is not familiar with this information then it is recommended that he or she read the main Readme.txt file and the NeonJax3D World Compiler Manual before reading this. This file contains information regarding the usage of the NeonJax3D Path Crawler. The Path Crawler is used to generate NeonJax3D Path object source code to be used in Scene source files. This tiny 32-bit DOS DPMI program reads two color 8-bit BMP line drawing images and traces all of the path segments in the image. The PathFind program outputs the segment data in a J3D Scene File compatible format which may be cut and pasted into a Path definition. The usage specification for PathFind.exe is below:
The following files should be present in the 'PathFind\' folder:
| |||||||||||||||||||||||||||||||||||
| Simple Usage |
|
To test the PathFind.exe program, execute the 'Nuclear-Path-Create.bat' batch file. This script runs the PathFind program on the 'Nuclear4.bmp' image and directs the output to the 'Nuclear.txt' file. The Path source code may then be cut and pasted from the 'Nuclear.txt' file to the user's J3D Scene source file. |
| Won't You Be My Neighbor? |
|
The PathFind program works by first determining the background and foreground colors, then searching through the image data until the first foreground pixel is found. The PathFind program then crawls along the path found, recording the steps taken, until the path ends. Then the program saves the segment information and begins searching through the image data to find the next segment. Up to 16 segments are found and converted in this way. The paths in the line-drawing BMP images must be special. They must be 'connected in the 4-neighborhood'. This means that the PathFind path crawler must be able to crawl along the path of the image by taking single steps of either left, right, up, or down. The path may not have any diagonal steps. It should also not have any extra pixels. From each point on the path, there should only be two ways to go: back or forward. If there are extra pixels, the Path Crawler may produce some very small Segments (just a few steps) or there may be more segments than necessary. The table below illustrates these requirements: 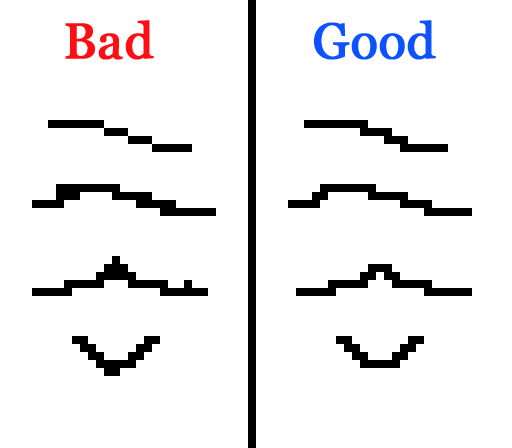 |
| Making Your Own Paths |
|
The Nuclear1.bmp - Nuclear4.bmp images provide an example of the steps necessary to prepare an image for PathFind using an image editing program such as Paint Shop Pro or Adobe Photoshop. The following list enumerates all of the steps of this process:
This procedure may be used to convert any image into a line drawing suitable for conversion by PathFind and use in NeonJax3D. As a final step, it is necessary to choose a point in the image to use as the object's center point. Write down the coordinates of this point and save the 8-bit BMP image in the 'PathFind\' directory. Finally, either call PathFind.exe from a command prompt, or create a batch file copied from 'Nuclear-Path-Create.bat'. Direct the output of the PathFind program to a file, then cut the resulting Path code from this file and paste it into your Scene source file. |
